Sunday, June 23, 2013

Outdoor shooting - One day in Crosby

  As we finished the research of the different genres of location photography in class, the tutor set us little mini tasks for every week to test ourselves in different situations and create our own location photographs. The first two tasks were 'Lifestyle' & 'Documentary' (Street Photography) that I've already done and posted on this blog.

My final assignment for Location photography was a Self- directed brief. I was required to produce some more independent work based on my preferred subject matter. So now, I'm going to discuss and show you some of my recently captured images. A few weeks ago, when the weather was perfect to fill up my boots and do some location photography, I went down to Crosby beach in the mid afternoon. To take images on location is always a challenge because you have to manipulate and take control of the lighting,backgrounds, etc. I knew that Crosby is one of the photographers favorite place and there I can take different types of images, for example !!!Documentary,Landscape and Nature!!!

  So when I got there, I really tried to apply all my knowledge and skills that I've learned so far on the course, during my first academic year at St Helens College. Here I'm mainly thinking about compositions,
like triangular/circular, rule of third, framing, repetition, etc or the formal elements, like color, line, shape, tone, etc. Also, I did a recap on depth of field because that's always has an impact on the composition, so I looked through my old notes and refreshed my memory about how I can make images that's got either shallow or wide depth of field. Additionally, when I did my primary research in the library, I found a book - Techniques of Natural Light Photography by Jim Zuckerman - that helped me to choose the right time of day for my shooting. Jim Zuckerman shows how you can take great pictures morning, noon and nearly night - outdoors and in - with natural light. The golden hours are known as the best time to shoot. The golden hours are usually an hour after sunrise and an hour before sunset. During these hours I can get the benefit of the perfect light.

  Right, I arrived in Crosby around 3 o'clock and I used the mid-afternoon and late-afternoon hours to shot some Documentary and Nature images.

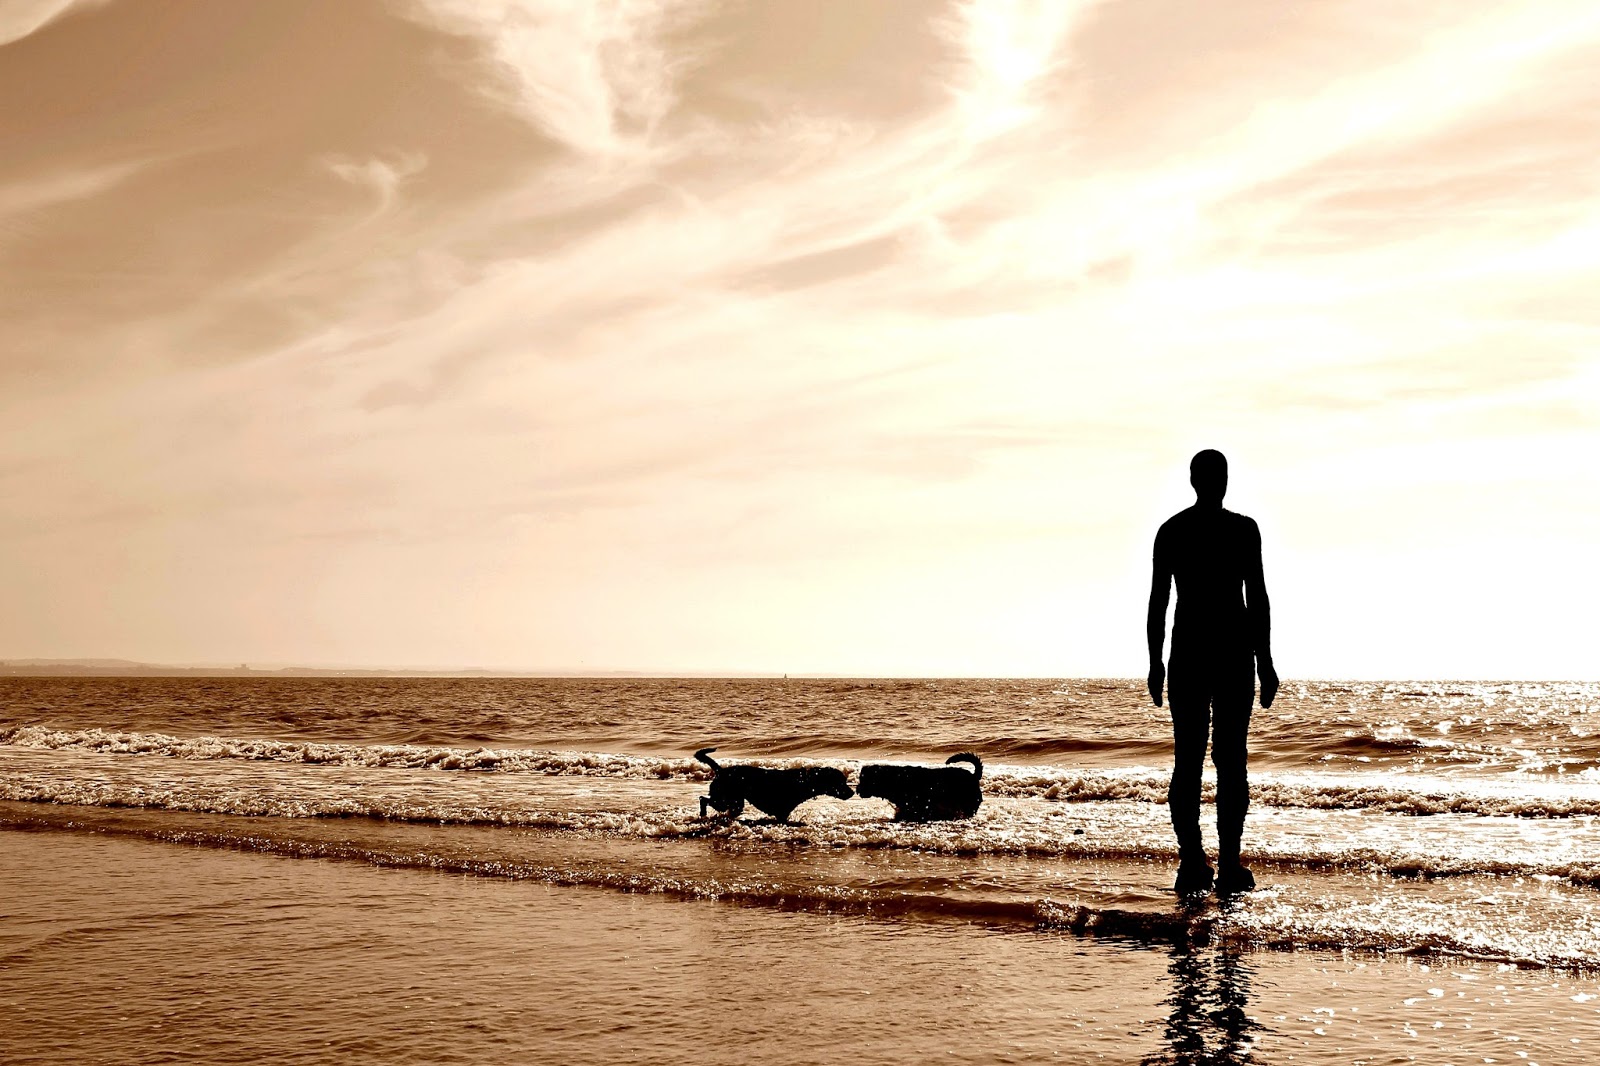
Documentary: (All images are edited into sepia and I pumped up the contrast,shade and the saturation. Also, the sepia helps you to see the tonal balance of the image.)


Image No. 1

Compositions:
* Rule of thirds
* Negative space.
* Wide depth of field.
* Off center weighted.
* Shot from directly above.
* Repetition of the footprint.
* Triangular composition between the 3 white pebbles.
Formal Elements:
* Shape of the footprints.
* Texture of sand.
* Tonal balance.

Image No. 2

Compositions:
* Rule of thirds.
* Bottom weighted.
* Shot in a low angle.
* Slight shallow depth of field.
* Side lit gives more texture.
* Implied lines draw your eyes.
* Captured movement gives dynamic to the image.
Formal Elements:
Tonal balance.
* Texture of sand and subjects.
* Diagonal lines - the lean of hands, legs, horizon. 

Image No. 3

Compositions:
*Rule of thirds.
* Bottom weighted.
* Slight shallow depth of field.
* Captured movement gives dynamic to the image.
* Repetition of the houses at the background.
Formal Elements:
* Tonal balance.
* Diagonal lines lead your eyes.
* Texture of sand and dog's hair 

Image No. 4

Compositions:
* Rule of thirds.
* Implied line.
* Wide depth of field.
* Reflection in the water.
* Repetition of the houses at the top.
* Captured movement gives dynamic to the image. 
Formal Elements:
* Tonal balance.
* Texture of sand.
* Diagonal lines create dynamic and horizontal line.

Image No. 5

Compositions:
* Rule of thirds.
* Bottom weighted.
* Reflection on the water.
* Wide depth of filed. 
* Freezing movement.
Formal Elements:
* Tonal balance.
* Horizontal and diagonal lines. 

Image No. 6

Compositions:
* Rule of thirds.
* Wide depth of field.
* The reflection on the water form a triangle. 
* Captured movement gives dynamic to the image.
Formal Elements: 
* Tonal balance.
* Texture of sand.
* Horizontal lines.

Nature: (All images are edited. I pumped up the contrast, shade and the saturation.) The late afternoon hours offers many of the same characteristics as sunrise. During these hours you can see the effect of the warm and low-angled light on a variety of subjects and that how it creates texture. Also you will get more texture and longer shadows if you side lit the subject. 

Image No. 7

Compositions:
* Rule of thirds.
* Off center weighted.
* Repetition of stones.
* Slight shallow depth of field.
* The light gives a soft and warm effect.
* Side lit therefore it gives more texture.
Formal Elements: 
* Texture of stones and moss. 
* Natural colors (brown,gray)
* Secondary colors (orange,green)
* Primary color (red)

Image No. 8

Compositions:
* Rule of thirds.
* Negative space.
* Off center weighted.
* Shallow depth of field.
* Side lit therefore it gives more texture.
* The light gives a soft and warm effect.
Formal elements:
* Tonal balance.
* Texture of sand and shell.

Landscape: Just to know what Environmental photography is: It is about capturing the essence of a landscape. Considering the elements of your surroundings in the outdoor world.
  Alright, so to capture my landscape images I was waiting till sunset because no other time of the day offers such a wonderful opportunities to capture a classic sunset shot. The brilliant colors of the sky, the long shadows, pronounced textures and the golden hues dramatize landscape,wildlife, portrait, etc.
  First of all I want to show you the dramatic difference between sunset lighting and late afternoon light in these two shots below. Because the colors and the quality of the natural light changes dramatically throughout the day. I also uploaded the unedited images of the examples. (All images are edited and I pumped up the contrast,shade and the saturation.) 

Ex.1: Unedited - Late afternoon light
Ex. 1: Edited - Late afternoon light


Ex. 2: Edited - Sunset light
Ex. 2: Unedited - Sunset light
Image No. 9

Compositions:
* Rule of thirds.
* Wide depth of field.
* Off center weighted.
* Repetition of the windmills.
* Reflection of the golden sunlight.
 * Scaling between the two iron man
Formal Elements:
* Horizontal line.

Image No. 10

Compositions:
* Rule of thirds.
* Wide depth of field.
* Off center weighted.
* Reflection of the golden sunlight.
* Scaling between the two iron man
Formal Elements: 
* Texture of sand.
* Horizontal line.

Image No. 11

Compositions:
* Rule of thirds.
* Wide depth of field.
* Repetition of the windmills and birds.
* Reflection of the golden sunlight.
Formal Elements:
* Horizontal line.
* Texture of sand. 

And finally but not least ... my favorite one ... :)

Image No. 12

Compositions:
Framing.
* Rule of thirds.
* Off center weighted.
* Slight negative space.
* Shallow depth of field.
* Reflection of the golden sunlight.
Formal Elements:
* Horizontal lines.
* Texture of sand and iron man. 

Image No. 12 is my favorite because the framing makes the image special and interesting. It looks like an image in an image. You're looking at the hole image first,then you're looking through the gap. Also, I love the halo around the sun and the little iron man in the distance. These little details make the image more interesting. 

(All of the above photos taken by Fanni Horvath using a Canon EOS 1100D.)

I'd like to go back to Crosby one time, because I really loved shooting there. So, next time when I get there, I'd like to try out some new things. So just to see how can I improve my work in the future I did a small amount of research on professional photographers' work. Which can be also good to compare my work and other's work. I found two types of examples that really caught my eyes. On the first two images, you can see that how the photographers used the puddles/the still water to reflect the sky. On both image the bisector is in the middle and also those brilliant colors of the sky, the shadows, the reflection on the water or the pronounced textures are all dramatize the whole feeling of the image. While the last two examples are completely the other end. The feeling of the images are so relaxed and peaceful, mainly because the colors are pale and the sky is clear. Also, I love the effect of the water, how the photographers made it so smooth and silky.


My opinion about what kind of equipments could be used to produce these images is that I think the photographers used a wide angle lens or a medium length lens, tripod, lens hood, filters. (A tripod is definitely used on the last two examples.) I said wide lens (14 mm - 35 mm) because the wide angle lens is traditionally the go-to lens for landscape photographers. So like on the top right image, the suspected wide lens allowed the photographer to capture a very wide shot. Perhaps for the 3 other examples, the photographer used a medium length lens (40 mm - 150 mm) which is a great lens for capturing landscapes as your naked eye sees them. The camera settings were probably a slow shutter speed and high f-stop so they could get a wide depth of field and the silky water effect on the last two. Finally the ISO is around 100-200.


So next time I will be really looking for those puddles and hopefully I will find some interesting reflection in it. Also, I will have a go to get that silky water effect. And if I'll correctly read the weather and light conditions then I'll know which type of image I should attempt on that day. Lastly, I want to buy some new props too for next time, like filters and lens hood because some of the most stunning landscapes are shot during sunrise and sunset and this often puts the sun in a direct line of sight with the lens causing nasty lens flare. However I quite like the lens flare now on my images. 

Friday, June 21, 2013

Collections - On 4 paws

As part of my location unit, I've been ask to capture street photos that form a 'collection'. I have decided to have my collection focus around dogs because they're so photogenic and they all have different characters. I love working with them. The place that I chose is always my starting point if I want to do some street photography. It's the Newton-Le-Willows' Saturday Market. There is always loads of people and interesting happenings. To get these images, I asked permission from the dog owner first. As they said 'yes', I tried to get on the dogs' level. The owners were so co-operative and they started to posed their dogs. Everyone seemed to be enjoying the photo shoot. The dogs either payed attention of the camera or of their owners. I shot on time value, because the dogs were moving and I didn't want to get any motion blur.

Image No. 1

Camera: DSLR, Canon EOS 1100D
Lens: 18 mm - 55 mm
ISO: 100
Aperture: f/8
Shutter speed: 1/125 s
Light used: Available light/Natural light
Compositions: Centered, landscape format, depth of field, eye contact, framing
(I looked through between hanging clothes :D )
Post production/Adjustments: Saturation

Image No. 2

Camera: DSLR, Canon EOS 1100D
Lens: 18 mm - 55 mm
ISO: 100
Aperture: f/5
Shutter speed: 1/125 s
Light used: Available light/Natural light
Compositions: Landscape format, depth of field, reputation, high angle, diagonal lines
Post production/Adjustments: Saturation

Image No. 3

Camera: DSLR, Canon EOS 1100D
Lens: 18 mm - 55 mm
ISO: 100
Aperture: f/9
Shutter speed: 1/125 s
Light used: Available light/Natural light
Compositions: Landscape format, depth of field, eye contact, slightly tilted lens
Post production/Adjustments: Saturation

Image No. 4

Camera: DSLR, Canon EOS 1100D
Lens: 18 mm - 55 mm
ISO: 100
Aperture: f/8
Shutter speed: 1/125 s
Light used: Available light/Natural light
Compositions: Landscape format, depth of field, close up profile
Post production/Adjustments: Saturation

Image No. 5

Camera: DSLR, Canon EOS 1100D
Lens: 18 mm - 55 mm
ISO: 100
Aperture: f/5
Shutter speed: 1/125 s
Light used: Available light/Natural light
Compositions: Landscape format, depth of field, profile
Post production/Adjustments: Saturation

To sum up, I think it was a successful shooting. I was more confident now than I was before (lifestyle shooting) and the most positive development is that I could create rapport between me and the owners. I found that dog owners are more open and friendly. Also, they're co-operative, because they are proud of their dogs. 

My final image is an exception, but I had a chance to capture this gorgeous moment between the 2 girls and also I could shot on their level. I just love the nature beauty in this image and the bond between the two. My eyes just moving around in a triangular form. From one face to the holding hands then to the other face. So this image's definitely got a triangular composition.

Image No. 6

Tuesday, June 18, 2013

Lifestyle shooting - Bday party

Image No. 1

Camera: DSLR, Canon EOS 1100D
Lens: 18 mm - 55 mm
ISO: 100
Aperture: f/5.6
Shutter speed: 1/160 s
Light used:
Available light/Natural light
Compositions: Triangular, linear, rule of thirds, portrait format
Problems: Overcrowded garden, lack of space, changing light conditions
Post production/Adjustments: Brightness/Contrast, Black&White + customized colors, Dodge tool

Image No. 2

Camera: DSLR, Canon EOS 1100D
Lens: 18 mm - 55 mm
ISO: 800
Aperture: f/5
Shutter speed: 1/15 s
Light used: artificial light, flash
Compositions: eye contact, depth of field, portrait format
Post production/Adjustments: Brightness/Contrast, Black&White + customized colors

 Image No. 3

Camera: DSLR, Canon EOS 1100D
Lens: 18 mm - 55 mm
ISO: 800
Aperture: f/4.5
Shutter speed: 1/2000 s
Light used: Available light/Natural light
Compositions: eye contact, portrait format, shot on level, centered
Problems: changing light conditions, not appropriate camera settings
Post production/Adjustments: Brightness/Contrast, Black&White + customized colors , Dodge tool

 Image No. 4

Camera: DSLR, Canon EOS 1100D
Lens: 18 mm - 55 mm
ISO: 400
Aperture: f/4
Shutter Speed: 1/800 s
Light used: Available light/Natural light
Compositions: portrait format, centered
Problems: changing light conditions, not appropriate camera settings
Post production/Adjustments: Brightness/Contrast, Black&White + customized colors , Dodge tool

 Image No. 5

Camera: DSLR, Canon EOS 1100D
Lens: 18 mm - 55 mm
ISO: 400
Aperture: f/4.5 
Shutter Speed: 1/200 s 
Light used: Available light/Natural light
Compositions: side lit, portrait format
Problems: Overcrowded garden, lack of space, changing light conditions, side lit,not appropriate camera settings
Post production/Adjustments: Brightness/Contrast, Black&White + customized colors, Levels

 Image No. 6

Camera: DSLR, Canon EOS 1100D
Lens: 18 mm - 55 mm
ISO: 400
Aperture: f/5.6 
Shutter Speed: 1/200 s 
Light used: Available light/Natural light
Compositions: side lit, shot on level, centered, landscape format
Problems: Overcrowded garden, lack of space, changing light conditions, side lit,not appropriate camera settings
Post production/Adjustments: Brightness/Contrast, Black&White + customized colors


To sum up this shooting, I think this was my hardest challenge on this course so far. Nothing went well, nothing went the way I planned. Even though I've got some good (not very good as I planned!) images of the children. I let them come and go as they pleased so they look natural but this caused some problem such as getting the back lighting. As you can see on the last two image I couldn't get the back lighting properly. I tried to get on their level but I couldn't avoid the disturbing things at the backgrounds. The garden was so overcrowded. Also, the images don't really show that it's a birthday party. I think I should have took better or more interesting images but I faced with numerous problem. The changing light conditions and the one time moments are totally made the shooting difficult to do. I totally messed up my camera settings and I had not had time to fix this problem because the moments happen only once. So, I totally lost the control during the happenings. Although, I was thinking about back lighting the subject, I couldn't deal with the changing light conditions. So this will be something I'll have to practice in summer and check up on the right camera settings for changing light conditions. It was a stressful first lifestyle shooting on location and I think I chose one of the hardest type of it. If I would have chosen a family with grown-up children then I would have more control on the situations. Hopefully, next time I will do better and I will be more confident. 

Wednesday, June 12, 2013

Problems on location & solutions

  In this post, I listed some of the possible problems that may can occur on the day of location shoot. After, you can find some tips/solutions that I came up with. Hopefully those can help you to dealing with the incurred/happened situations/problems.

Problems on location:
  1. Poor weather conditions - rain,snow,wind
  2. Changing light conditions - too bright, too dull
  3. Uncooperative/unwilling clients, children (crying/shy children), parents, partner 
  4. Unmet client expectations
  5. Limited resources
  6. Faulty equipments
  7. Wrong time of the day/ Time management
  8. Busy places/ People in the way or shot/ Interrupted by the public
  9. Restricted public areas (shopping centers, swimming pools, colleges, etc.)
  10. Not getting the right: view, angle, unpredictable moment, back lighting, suitable background


Solutions would be:


The key words here are:
*Research *Planing *Time management *Right/Spare Equipments *Communication
  1. Check the weather forecast on the day of shoot. Have a back up plan for an other location, because the weather conditions may can change over or find a shelter. If your clients are willing to work in the changed circumstances than just improvise and work with the weather. Use brollies.
  2. Use available light. Back lit subject, side lit subject. Use a 5 in 1 reflector. 
  3. Create rapport between you and your models. In shy or crying children case, bring in treats and toys or an extra family member to distract the children attention away from the camera and make them feel more comfortable and relaxed. Let them come and go as they please. But this last bit can cause more problems to you. Like they start running away or facing the sun. Ask a family member to help you out. 
  4. To avoid uncooperative clients, make a booking beforehand, meet with your clients, ask them about their ideas, so you can ensure that you're clear on your clients' expectations. Discuss what they are aiming for and then planning your shoot. Be aware of communicating with them in a polite way. Also, give them your 'Terms and conditions agreement' to read and sign it. So if any problem occurs during the shooting you can referring back to your agreement.
  5. Obviously use what you have got and if you have the money then buy new things. 
  6. Check all the equipments and ensure all of them working right and ready to use, as well as appropriate for the shooting you're doing. It's always best to be prepared and have a second camera, spare equipments (buttery,lenses,filters,etc.),so if a failure will happen you can just easily swap the wrong object to the right one.
  7. Research/plan ahead, if you know you're going to shoot on a public place, try to find out what is the best time of the day when the roads/parks are less busy. Also, time yourself.
  8. If you're shooting on a busy place, then it's obvious you will get people passing by and walking in the shot. Just try to be patient and wait for the right moments. 
  9. Again research/plan ahead, if you want to shoot on a restricted public area because in that case you will need to ask for permission.
  10. Visit the place beforehand and look for angles,compositions,backgrounds. Just get to know the place, so when the day's coming you will already know where to stand your model and what formations you're going to use. What equipments can might be useful there. Make the things easy and continuous to yourself.

Tuesday, June 11, 2013

Different types of location photography

Location GENRES


Yas Marina Circuit, Abu Dhabi


  • Architectural: Architectural photography is about capturing the characteristics of buildings/structures (bridges,stadiums, etc.) both interior and exterior. The main focus is on the building. The top priorities of the photographer are the lighting and the angles. That can help the photographer to add depth to the image and capture the building in a point of perspective. The shots are usually taken in daylight. And it's also important to include some of the formal elements, like patterns,lines,colors,shapes,textures,size to show the beauty of the building and add interest to the image. There is a typical type of lens used for taking pictures of buildings, called Tilt-Shift lens. This lens allows the photographer to manipulate the angle and distort the original perspective of the building is taken at and making it appear straight and face on. So the tilt-shift lens is an extremely useful piece of equipment to have, to create brilliant architectural images. Although it has a disadvantage. In full shift it decreases the sharpness of the image. However, if you do not have a tilt-shift lens, you can still achieve a similar effect by post production, using the skew tool in Photoshop. Other useful equipments can be: fish eye lens, wide lens, tripod.

Save Africa by Nick Brandt


  • Environmental portraiture: (It can include: Lifestyle {Family}, Events {Birthday party}). Environmental portrait photography is usually having the subject in their most natural environment. This can be anything from work, home to favorite places (own garden, beach, parks, fields, etc.). Obviously the place is depending on the subject, where the subject feels more relaxed,comfort and less pressured. Clearly, choosing the place is the most important bit in environmental portraiture, because the environment always has an impact on the subject and affect the way they present themselves in the shoot. The photographer aim here is to capture the subject in its most natural state without the subject becoming aware of you photographing. Bit like in street photography scenarios. The recommended kit for shooting portraiture is a lens between 50 mm - 200 mm, a tripod and 5 in 1 if it's required. These different types of lenses and other accessories will allow you to work in wide range. With the 50 mm lens you can shoot in darker conditions because it has a very low F stop which allows lots of light into the camera. However you can't zoom in. Therefore a zoom lens should be useful, that will allow you too zoom in and take close-up images without disturbing the subject. However, you won't be able to take darker images, only if you've got a tripod.


  • Sport: Sport photography can be applied for all sports (basketball,football,bmx,swimming,tennis,etc.)
    and it's all about shooting fast and unpredictable actions. The images should always be in sharp focus and usually they have shallow depth of field when the main subjects are in focus and everything else around is completely blurred. The useful and advised lens for sport photography is a Telephoto lens (400 mm + ), due to the fact that allows the photographer to zoom far away and remain well in focus close without disturbing any action. Usually shooting in aperture value mode. The style of photography can be closely linked to journalism as the result are usually broadcast. Again, sport photography can be either shot indoor or outdoor. On places like: football pitch, tennis court, athletic field, swimming pool, etc. 


Few more genres:
  • Wildlife: Place: safari, nature reserve, forest, rain forests, canon, rivers, oceans (underwater), desert
  • Commercial
  • Documentary: Wherever the event is taking Place: In/outdoor. War, public places, poor countries.
  • Fashion
  • Landscape: Place: skylines, hills, rivers, oceans, mountains, deserts, lakes, country sides.
  • Nature
  • Street: Place: high street, squares, parks, roads, gardens, playgrounds, any street.
  • Scientific
  • Wedding: Place: churches, registry office, seaside, hotel room, gardens, castle. 

Wildlife


Landscape


Wedding


5 in 1 Reflector

Using 5 in 1 Reflector Outdoor


Silver,gold,white,black,translucent.

This kit start with a white translucent panel and includes a reversible wrap that can be zipped around the diffusion panel. One combination is a white surface on one side and a gold on the other. An other combination is a black surface on one side and a silver on the other. 

I have been already using reflector in studio but I have not used it on location yet. Now, I will show you various images that I took on location using a 5 in 1 reflector in sun light and in shadowed places. These are the different type of shots that can be achieved using just natural light and a 5 in 1 reflector.

Equipment and camera setting: * 1 DSLR camera with a 18 mm - 55 mm lens, * 1 reflector (5 in 1), * ISO 100 (because of the bright sunny day), * shooting in aperture value

If you use natural light and no reflector, you should position your subject facing away from the sun. So the light coming from behind will create a glow around your subject. This is a good way to brighten up your model and get the best out of your composition without using a reflector. Also, you can avoid squinting and unwanted shadows on your subject's face what always happen when the sun shining directly onto your subject.


1. On this first image, no reflector was used. As you can see I couldn't get the sun 100% behind my model but I still got a nice hair/back light on my subject (thin halo). The sun actually coming from the side however her face is still in shade.


 2. The weather was getting a bit cloudy here but the model is still facing away from to the sun and here I started to use the silver side of the reflector. With this silver reflector, I increased the highlights and contrast on the model's face. It's perfect for B&W photography.


3. On this third shot the model was facing the sun but I used the white translucent/diffuser to diffuse/block sunlight to create softer,lower contrast lighting. Diffuser is perfect for outdoor portraits or whenever a softer light is needed.


4. Now on this fourth example the sun directly facing the subject. Therefore the subject is squinting and her face is shaded. This is what you should always avoid on a bright sunny day, facing the subject towards the sun.


5. In this image the model placed in the deep shaded area. No reflector used. The building blocked out the sunlight. This produced a different lighting effect (darker tones).


6. This image is still captured in the shaded area but I brought the subject forward to the edge of the shade. So the non shaded asphalt was bouncing the sunlight onto the model and lightened up her face. You can see how this little change affect the lighting on your subject's face. This one is much lighter than the previous one in which the subject was placed further in the shade.


7. Still in the shade, but again I used a silver reflector to increase the highlights.


8. This last image is an example of when you shouldn't use the gold reflector. Because the gold reflector produces a golden fill, add a warm cast to the subject and sometimes as in this case, it makes the model's skin far too bright and unnatural/false. The model looks orange.

The other variations, like the white (which produces an even neutral colored bounce of light, fill light) and black ( which stops sun or window light and makes the shadows) are also good for portraits.